

Before-and-after photo proof for service visits is a simple way to show what your team found, what they did, and what changed at the job site. For small field teams in the United States, it helps reduce customer disputes, speed up approvals, and give managers a clear record without chasing photos through texts, email, or paper files.
Key takeaways
- Before-and-after photo proof creates a clear service record for each visit.
- A good process matters more than fancy equipment or long forms.
- Teams should capture photos the same way every time, with timestamps, job details, and clear labels.
- Photo proof helps with customer communication, internal accountability, and cleaner billing support.
- Mobile field workflows work best when photos, notes, time, and job status stay in one place.
- Small teams can start with a simple checklist and improve the process over time.
What is before-and-after photo proof for service visits?
Before-and-after photo proof for service visits means taking photos when your technician arrives and again after the work is complete. The photos are tied to the job, customer, location, and visit time.
This sounds basic, but it solves a real problem for small service businesses. Many teams still collect proof in scattered ways. A tech snaps a few pictures on a phone. Then they send one in a group text, email two to the office, and forget the rest in the camera roll. Later, the customer asks what was done. The office has to piece the story together.
A simple photo-proof process creates a clean chain of evidence. It shows site condition on arrival. It shows completed work before the technician leaves. It also gives managers a quick way to review quality without driving to the site.
This is useful for many U.S. service teams, including:
- HVAC maintenance companies
- Commercial cleaning crews
- Landscaping teams
- Pest control businesses
- Plumbing and electrical service companies
- Property maintenance vendors
- Facilities service contractors
If your business serves offices, stores, warehouses, apartment buildings, or homes in places like Chicago, Houston, or Detroit, photo proof can quickly become part of your standard service routine.
Why do small field teams need a photo-proof process?
Small field teams often do not lose money because of big disasters. They lose money in small, repeated mistakes. A missing arrival photo. An unclear completion picture. A manager who cannot verify whether the site was serviced. A customer who delays payment because the work record is weak.
Before-and-after proof reduces these issues in practical ways.
First, it helps customers trust the work. A customer may not be on-site when the technician arrives. Photos let them see the starting condition and final result.
Second, it helps your office answer questions faster. If a client says a drain was not cleared or a unit was not cleaned, your team has a visit record ready.
Third, it supports billing. Photos are not a substitute for an invoice, but they often help explain what was done, especially in larger service jobs or recurring contracts.
Fourth, it helps train your team. Managers can review photo quality, spot missed steps, and coach technicians on documentation habits.
Fifth, it reduces dependence on memory. No one wants to debate what happened at 4:30 PM three weeks ago. A documented record is better than a vague update.
How should technicians take before-and-after photos?
Take one clear set before work starts and one clear set after work ends. Each set should match the same area, angle, and job scope so a manager or customer can compare them quickly.
The goal is not artistic photography. The goal is consistency. When every technician follows the same process, the proof becomes easier to review and more useful.
Here is a simple standard your team can adopt.
1. Take the “before” photos first
Photos should be captured before tools are unpacked or work begins. This matters because once the area is disturbed, you lose the original condition.
Ask technicians to capture:
- A wide shot showing the full work area
- A mid-range shot showing the specific issue
- A close-up if damage, dirt, wear, or blockage is relevant
For example, a commercial cleaning crew servicing a building lobby should capture the overall lobby area, a section with visible dirt or clutter, and a close-up of any problem spots.
2. Match the “after” photos to the same angle
The best after photos mirror the before shots. If the before image shows the rooftop unit from the front-left side, the after image should do the same.
This makes comparison easy for the office and the customer. It also prevents confusion when there are multiple assets on-site.
3. Keep photos bright, stable, and readable
Technicians do not need expensive gear. A standard phone camera is usually enough. But they do need simple rules:
- Hold the phone steady
- Use good lighting when possible
- Avoid blurry shots
- Make sure labels, gauges, or visible conditions can be read if relevant
- Do not stand too close unless a detail shot is needed
4. Include context in the job record
A photo without job context is less useful. The record should connect the image to:
- Customer name
- Site address
- Technician name
- Date of visit
- Time of visit
- Job or work order number
- Notes on what was found and fixed
This is why many teams move away from saving photos only in the phone gallery. It is better when the images live inside the actual service record.
5. Set rules for sensitive environments
Some work sites include people, personal items, or sensitive business information. Train your team to avoid capturing unnecessary personal details, computer screens, payment information, or faces when the job does not require it.
For indoor commercial accounts, keep the photos focused on the serviced area. For residential visits, use a tighter frame and avoid unrelated rooms or belongings.
What should be included in a service-visit photo checklist?
Use a short checklist that technicians can complete on every visit. Keep it simple enough to use in the field without slowing down the job.
A good checklist might include:
- Confirm site address
- Take wide before photo
- Take detail before photo
- Complete service task
- Take matching wide after photo
- Take matching detail after photo
- Add short service note
- Mark job status
- Log time spent
- Submit before leaving site
This kind of checklist helps especially when your team has newer technicians, subcontractors, or seasonal staff. It also creates a repeatable process across service types.
For example, a plumbing team might add “photo of leak source” and “photo of repaired area.” A landscaping crew might add “front elevation before” and “curbside after cleanup.” A property maintenance team might require one exterior and one interior image for each work order.
Where do small teams usually get photo proof wrong?
Most teams do not fail because they never take photos. They fail because the process is inconsistent.
Here are the most common mistakes.
Photos live in personal phones
If technicians keep everything in their camera roll, the business record depends on personal habits. Photos are hard to find later. They may get deleted. They may never reach the office.
Images are not tied to the job
When photos are sent by text or email, someone later has to figure out which customer and which visit they belong to. That wastes office time and causes errors.
“After” photos are missing
A technician may take a before image and then forget the final result. That creates a gap in the record.
Angles do not match
If the before photo shows one side of the asset and the after photo shows another, comparison is weak. The customer may still question the work.
Notes are too vague
“Job done” is not enough. A short, useful note is better: “Cleaned condenser coil, removed debris, tested operation, unit running normally.”
Proof arrives too late
Photo proof is most useful when it is submitted from the field, not later that night or two days later.
Can you use ai before-and-after checks?
Yes, but only as a review aid. ai before-and-after checks can help flag missing images, poor photo quality, or unmatched angles, but your team still needs a clear capture process.
Even if software adds smart review later, the field habit comes first. A blurry before photo cannot be fixed by automation. A missing after photo is still missing.
What can smart review help with? It may help managers spot jobs that need attention. For example, if a tech submits only one photo, the system can flag an incomplete record. If the image is too dark, a manager can ask for a better standard going forward. If the job type requires two required shots, the workflow can prompt for them before completion.
For small teams, this is the right way to think about it: use technology to enforce the process, not replace it.
That is also why a work-management system matters more than a generic messaging app. In a dedicated field workflow, photo proof can sit beside notes, visit status, and service history. TaskSiddhi’s field visits workflows are built around this kind of operational record, so the office does not have to reconstruct the story later.
How do you roll this out without slowing the team down?
Start with one simple rule set, train the team in the field, and make photo proof part of job completion. If the process takes more than a minute or two, it is probably too complicated.
A slow, heavy process will fail. Small teams need something fast enough to use on a busy day with multiple stops.
Start with three required standards
For most teams, these are enough at first:
- One before set
- One after set
- One short service note
Do not begin with a 15-point form unless your jobs truly require it. Simplicity drives adoption.
Train with real examples
Show your team what “good” looks like. Use examples from actual service categories. A warehouse floor cleanup photo is different from an HVAC filter replacement photo.
Point out:
- Good framing
- Useful lighting
- Proper angle matching
- Clear issue visibility
- Short, specific notes
Make the photos part of closing the job
The strongest habit is this: the technician should not mark the job complete until the proof is attached.
This prevents the common issue where the work status changes, but the proof comes later or not at all.
Review the first two weeks closely
Managers should check submissions daily at first. This lets you catch process gaps early.
Look for patterns:
- Are certain technicians missing after photos?
- Are some job types producing poor images?
- Are notes too short to be useful?
- Are photos being uploaded late?
Then tighten the checklist or coaching.
Use mobile-first workflows
Field teams do not work from desks. The process has to work on the phone at the job site. A good mobile app setup makes it easier to capture proof, add notes, and update status before leaving.
How photo proof helps billing, disputes, and customer communication
Photo proof does not replace proper service documentation, but it strengthens it.
When a customer questions a charge, your office can respond with a cleaner service record. That may include the time on-site, the work note, and before-and-after photos.
This is especially useful in recurring service contracts. A property manager overseeing several buildings may not visit each site. They still want confidence that the work happened.
Photo proof can also support internal review before billing. If the office sees that a job record looks incomplete, they can ask questions before sending the invoice. That is better than collecting payment slowly because the customer is uncertain.
For teams that use QuickBooks or Stripe in the finance stack, a stronger service record upstream often means fewer billing back-and-forth messages downstream. The point is not accounting automation here. The point is better operational evidence before the invoice is sent.
This can also help with larger commercial buyers that expect cleaner vendor documentation. Some procurement teams ask detailed questions. Others want reliable records because their own customers demand accountability. Even when buyers mention broader standards like SOC 2 expectations for vendors, your day-to-day service proof still comes down to basic operational discipline: clear records, clear ownership, and easy retrieval.
A simple workflow small teams can use today
If your team is still using WhatsApp threads, spreadsheets, or paper job cards, move one step at a time. You do not need a major rollout to improve this.
Here is a practical workflow for a five-to-thirty-person field team.
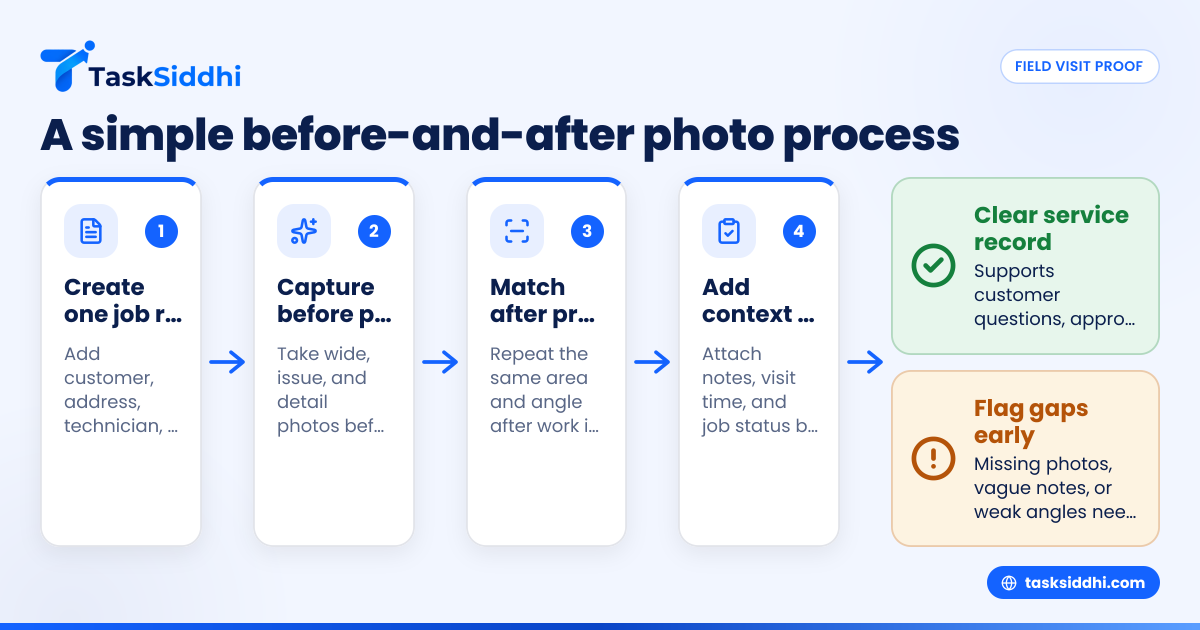
Step 1: Create one job record per visit
Each service visit should have its own record. That record should include the customer, address, assigned technician, due date, and job type.
Step 2: Define required photo types by service category
Not every visit needs the same shots. Create a short standard by service type.
Examples:
- HVAC: unit overview, issue area, completed repair
- Cleaning: room overview, problem area, finished area
- Landscaping: front area, debris/problem section, finished curb view
- Pest control: entry point, treatment area, completion proof
Step 3: Capture proof on-site
Photos should be taken at arrival and completion. Notes should be added before the technician leaves.
Step 4: Review from the office
Managers should be able to check active work, completed jobs, and missing proof in one system. This is where boards and views can help teams see what is done, what is incomplete, and what needs follow-up.
Step 5: Track patterns over time
The real value grows over weeks and months. You can identify repeat issues, missed steps, slow sites, and documentation gaps. A basic layer of reporting helps managers coach better and tighten service standards.
Step 6: Connect proof with time and status
A strong record includes not just photos, but also start time, completion time, and job state. Built-in time tracking can make the visit history more complete and easier to review.
What should you look for in a tool for before-and-after photo proof?
Choose a tool that makes the process easier for the field and clearer for the office. If it adds friction, your team will work around it.
Look for these basics:
- Mobile photo capture at the job site
- Photos stored with the specific job record
- Simple status updates
- Required fields or checklists
- Easy review for managers
- Searchable history for repeat customers
- Clear workflow for office and field users
This is where dedicated work-management tools are different from chat threads and shared folders. A message app is good for conversation. It is not a reliable operating system for service proof.