

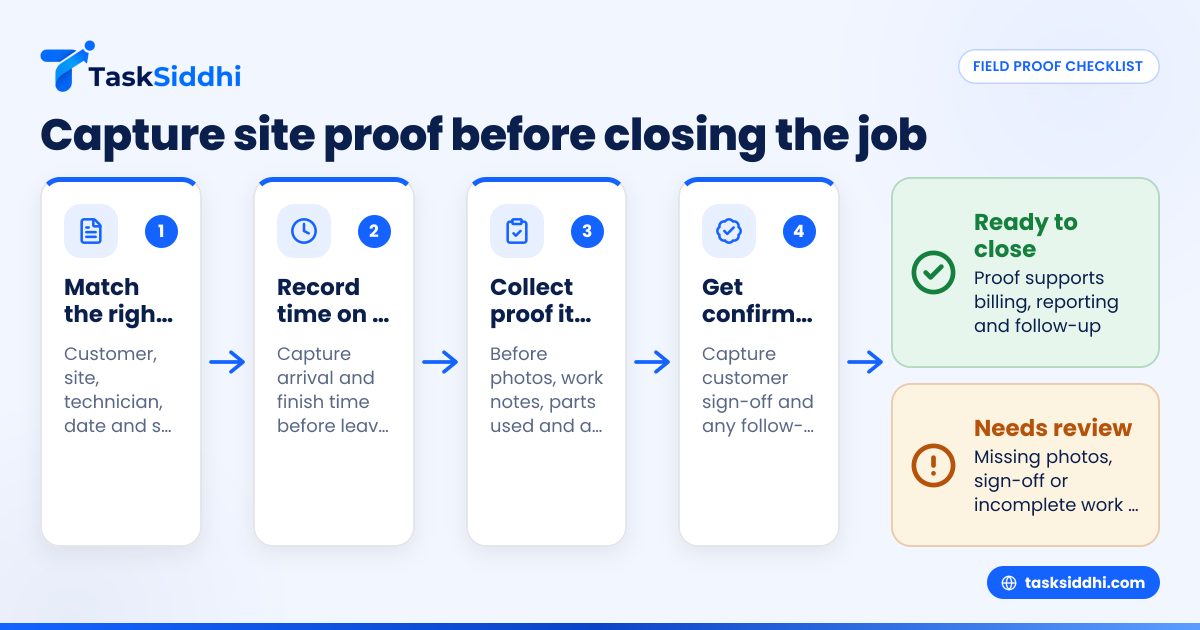
If your team closes jobs without clear proof, you invite disputes, delayed payment and rework. A simple site visit proof checklist in Australia helps you capture the right evidence before a technician leaves the site, so the job card, customer approval and invoice all line up.
Key takeaways
- A good site visit proof checklist records who attended, what was done, when it happened and the outcome.
- Photos, timestamps, notes and customer sign-off are the core proof items for most field jobs in Australia.
- The checklist should be short enough to use on every visit, not just problem jobs.
- Proof should support billing, internal reporting, warranty questions and follow-up work.
- Mobile checklists work best when staff are on the road and need to close jobs from site.
- Clear proof reduces back-and-forth with clients and helps owners manage teams across Sydney, Melbourne, Brisbane and beyond.
What is a site visit proof checklist in Australia?
A site visit proof checklist in Australia is a standard list of evidence your field staff collect before marking a job complete. It makes sure every technician captures the same core proof, whether they are doing maintenance, inspections, installs, repairs or client work.
For small field teams, this matters because work often lives across WhatsApp messages, paper notes and memory. That works until a client asks what time your technician arrived, which part was replaced, or why the site was left in a certain condition. If the answer is buried in chat messages, you lose time and trust.
A checklist fixes that by turning proof collection into a routine step. It also helps when you need to check labour time, confirm attendance, review quality or support invoicing through Xero or MYOB.
Why does site visit proof matter before closing a job?
Because once your worker drives away, evidence gets harder to collect. Photos are missed. Notes get shorter. Client signatures are forgotten. Small gaps become big admin problems later.
For many Australian service businesses, proof serves five practical purposes:
- It confirms attendance You can show the technician was on site at a specific date and time.
- It shows work completed Photos, notes and checklist items prove the job happened as described.
- It supports invoicing Good records help justify labour, materials and call-out charges in AUD ($).
- It reduces disputes If a client questions the result, you have a clear job history.
- It improves team accountability Managers can review job quality without chasing every technician for details.
This is especially useful for small teams that cover wide areas or run multiple jobs a day. A manager in Melbourne cannot physically inspect every completed job. Proof becomes the manager’s eyes.
What should every field worker capture before leaving site?
Capture the essentials: arrival and finish time, who attended, before-and-after photos, work completed, parts used, issues found, customer sign-off and any follow-up needed. If the proof would help you answer a billing, quality or warranty question later, collect it before the worker leaves.
That short answer is the standard. Now make it practical enough for daily use.
1. Job and site details
Start with the basics. Every proof record should match the right customer and location.
Include:
- Job number
- Customer or site name
- Site address
- Technician name
- Date in DD/MM/YYYY format
- Service type or job category
This sounds obvious, but many disputes start with mixed-up records. If your team services multiple sites for one client, exact site details matter.
2. Arrival and finish time
Record when the technician arrived and when the work finished. This supports labour billing and helps resolve client questions later.
If your team bills by the hour, time proof becomes even more important. Even for fixed-price jobs, timing helps with planning, utilisation and future quoting. Built-in time tracking can make this easier for mobile teams.
3. Before photos
Before photos create a baseline. They show the condition of the site, asset or problem area before any work starts.
Useful examples include:
- Damaged equipment
- Access conditions
- Existing wear or faults
- Safety issues
- Meter readings or panel displays
- Areas affected before repair or cleaning
Ask staff to take wide shots first, then close-ups. A blurry close-up with no context is often useless later.
4. Work completed notes
This should be short, clear and specific. Avoid vague notes like “job done” or “fixed issue”.
Better examples:
- Replaced damaged valve in plant room
- Reset controller and tested operation
- Cleaned filters and confirmed airflow restored
- Inspected external unit and found corrosion on terminal
- Completed scheduled six-month service
These notes should help a manager, client or admin person understand the outcome without phoning the technician.
5. Materials or parts used
If your business charges for parts, record them before job close. Include item name, quantity and, where useful, serial or model details.
This helps with:
- Accurate invoicing
- Stock review
- Warranty questions
- Future service history
It also stops the common end-of-day message: “I used two fittings and one switch, but I’ll send details later.”
6. After photos
After photos show the completed result. They are often the strongest proof item on the whole job.
Good after photos should show:
- Finished installation or repair
- Clean and safe work area
- Restored equipment
- Completed service point
- Any labels, settings or readings after work
For recurring maintenance, these photos build a useful history over time.
7. Customer confirmation or sign-off
If the client representative is on site, record their confirmation before leaving. This can be a digital sign-off, name and note, or another clear approval step.
This does not need to be complicated. The goal is to confirm that:
- Your technician attended
- The agreed work was completed
- Any issues or exclusions were explained
For many small service teams, this single step speeds up invoicing.
8. Follow-up actions
Not every job is fully solved in one visit. Your checklist should capture what happens next.
Include:
- Return visit required
- Quote needed
- Additional parts required
- Access issue prevented full completion
- Safety concern escalated
- Client requested extra work
Without this step, incomplete jobs are often marked closed by mistake.
The core site visit proof checklist Australia teams can use
Below is a practical checklist you can adapt for your own workflow.
Pre-close checklist
Before the technician marks the job complete, confirm:
- Correct customer and site selected
- Date recorded as DD/MM/YYYY
- Technician name attached
- Arrival time recorded
- Finish time recorded
- Before photos added
- Work completed notes added
- Parts or materials recorded
- After photos added
- Customer sign-off or confirmation captured
- Follow-up work noted if needed
- Any safety or site issue flagged
- Job status updated correctly
That is enough for most small field teams. If you add too many items, staff will skip the checklist under pressure.
How detailed should your checklist be?
Keep it short enough to complete in two to four minutes, but strong enough to defend the job later. Start with the core proof items, then add only what your team regularly needs for billing, quality checks or follow-up work.
The best checklist is not the longest one. It is the one your team actually uses on every visit.
A useful approach is to split items into two groups:
Mandatory proof
These should be collected on every job:
- Job details
- Time on site
- Before and after photos
- Work done notes
- Sign-off or client confirmation
- Follow-up status
Conditional proof
These are used only when relevant:
- Part serial numbers
- Compliance-related readings
- Access issue photos
- Damage notes
- Asset condition checklist
- Extra quote request
This keeps the process simple. It also helps different job types fit one system. For example, an inspection job in Brisbane may need more condition photos, while a repair visit in Sydney may focus more on replaced parts and testing notes.
Common proof gaps that cause payment delays
Most payment delays are not caused by the work itself. They are caused by missing detail around the work.
Watch for these common gaps:
No before photo
Without a before photo, clients may question whether the issue existed before your technician started.
Weak completion note
“Completed” is not enough. A better note gives the action and result.
Missing sign-off
When no one confirms the work on site, approval can get delayed inside the client’s team.
No record of parts used
Your admin team cannot invoice what they cannot verify.
No note on incomplete work
A half-finished job marked complete creates confusion, especially when invoicing starts.
Photos not linked to the right job
If photos live only on a staff member’s phone, you do not really have job proof.
These are exactly the kinds of issues a central system is meant to prevent.
Should photos, signatures and timestamps all be mandatory?
For most small field teams, yes. Those three proof items create a reliable record of attendance, condition and completion. If one is missing, your team can still finish the visit, but the manager should know why before the job is closed.
Think of them as your minimum proof standard.
Why photos matter
Photos are fast to capture and easy for clients to understand. They reduce arguments because they show visible facts.
Why timestamps matter
Timestamps support labour records and site attendance. They also help with route planning and team performance review.
Why signatures or confirmation matter
Client approval gives commercial closure. It does not solve every dispute, but it reduces many avoidable ones.
If your team handles field visits, a mobile workflow is usually the easiest way to collect all three while still on site.
How can small teams make proof collection consistent?
Use one standard job-close process inside a shared system, not memory or chat. Make the checklist mandatory, train staff on what “good proof” looks like, and review a few completed jobs each week to catch bad habits early.
Consistency comes from process, not reminders alone.
Here is a simple rollout plan.
1. Define your minimum proof standard
Choose the five to eight items that must be captured every time. Keep the list short.
2. Show examples of good and bad proof
Many staff are willing but unclear. Show them the difference between a useful site photo and a poor one.
3. Build the checklist into job close
Do not rely on end-of-day catch-up. The checklist should appear when the technician tries to complete the job.
4. Review completed jobs weekly
Spot check records. If you find missing proof, coach quickly before the habit spreads.
5. Use mobile-friendly tools
Field staff need something simple on the road. A mobile app is easier than paper notes later typed into a spreadsheet.
Where does an ai site visit workflow actually help?
An ai site visit workflow helps when it speeds up admin after the visit, such as organising notes, highlighting missing proof or helping managers review completed jobs faster. It should support the technician’s process, not replace clear photos, timestamps and customer confirmation.
In practice, the biggest gains still come from getting the basics right. Small teams often jump to automation before they have a standard proof checklist. That usually creates messy data faster, not better records.
Where AI can be useful is in these back-office tasks:
- Flagging jobs missing photos or sign-off
- Summarising technician notes for manager review
- Grouping repeat faults across similar jobs
- Helping owners spot patterns in incomplete work
- Surfacing proof gaps before invoicing
The key is to treat AI as a helper, not the proof itself. If a client disputes a job, you still need the original record.
Building your checklist into daily operations
A checklist only works if it fits the way your team already works. If the process feels separate from the job, staff will skip steps when the day gets busy.
That is why many teams build proof collection into the task board or job workflow itself. For example:
- New job created
- Technician assigned
- Travel to site
- Work in progress
- Proof captured
- Customer confirmed
- Job completed
- Invoice ready
When your workflow is visible, managers can see which jobs are truly ready to close and which still need proof. Shared boards and views are useful here because they make incomplete records easier to spot before admin chases staff.
If your business runs installs, repairs or maintenance, this also helps standardise work across different technicians. One person’s “done” should mean the same as another’s.
Reporting on proof quality
Once your checklist is in place, measure whether people are actually using it. This matters more than writing a perfect template.
Track simple operational measures such as:
- Jobs closed with all mandatory proof
- Jobs missing sign-off
- Jobs missing before or after photos
- Average time between visit end and job close
- Return visits caused by incomplete records
These are management numbers, not just admin numbers. They tell you whether your field process is strong enough to support invoicing, scheduling and customer service.
If you want to review patterns across jobs, simple reporting can help owners and managers see where proof quality drops by technician, client or job type.
A practical example for a small Australian service business
Imagine a seven-person service team covering Greater Sydney. Each technician does four to six visits a day. The owner used to rely on text updates, paper job cards and photos saved on personal phones.
The business had three regular problems:
- Invoices delayed because parts were not recorded clearly
- Clients asking for proof of attendance
- Repeat calls because follow-up work was not noted properly
A simple checklist changed that. Before closing a job, each technician had to record:
- Arrival and finish time
- Two before photos
- Clear work completed note
- Parts used
- Two after photos
- Site contact confirmation
- Follow-up required or not required
That gave admin enough information to invoice faster in Xero or MYOB, and it gave the owner a cleaner daily picture of work completed. The process was not complicated. It was just consistent.
For teams managing recurring service jobs or broader client work, that consistency is often the difference between controlled growth and daily chaos.
Choosing a tool without overcomplicating the process
Do not start by asking for every feature under the sun. Start by asking whether your team can close a job from site with complete proof in one flow.
Look for a setup that helps you:
- Assign and track jobs
- Capture notes, photos and proof in one place
- Record time on site
- Standardise job completion steps
- Review missing proof quickly
- Keep records tied to the correct customer and visit