

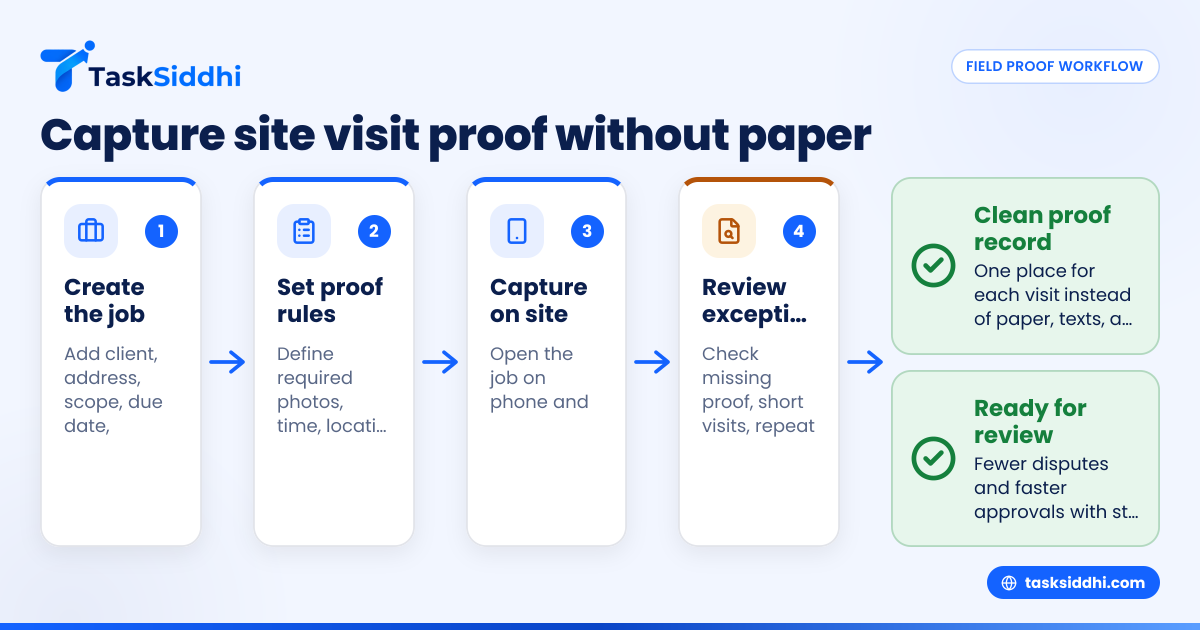
A site visit proof workflow in the United States is a simple, repeatable way to show that a field job happened, where it happened, when it happened, and what was done. For small teams, the goal is to replace paper job cards, text threads, and missing photos with a process that works from a phone and creates a clean record for operations, billing, and client follow-up.
Key takeaways
- A good site visit proof workflow captures four basics every time: photos, location, time, and client sign-off.
- The workflow should be easy enough for a five-person team to use in the field without extra admin.
- Standard proof reduces disputes, speeds approvals, and gives the office better records for billing and reporting.
- Mobile-first job steps matter more than fancy software features for small field teams.
- Clear rules for photo quality, timestamps, and signatures help managers trust what they see.
- A shared system beats scattered evidence across WhatsApp, email, paper forms, and personal phones.
What is a site visit proof workflow in the United States?
A site visit proof workflow United States teams can rely on is a standard process for documenting each field visit from dispatch to completion. It creates one record that shows who visited, when they arrived, what they did, and what proof was collected on site.
For many small businesses, this proof lives in too many places. A technician sends one photo by text. A supervisor gets an update by phone. A signed paper form stays in the truck. The office later tries to piece the story together for billing or a customer dispute.
That patchwork creates real problems. A customer may say nobody came. A property manager may ask for before-and-after photos. An office admin may need proof of work before sending an invoice from QuickBooks. If the proof is incomplete, the business waits to bill or writes off part of the job.
A better workflow fixes that by making proof collection part of the job itself. The tech follows the same sequence every time. The office can review the visit in one place. The owner gets a record that is easier to audit, easier to report on, and easier to share with the client when needed.
This matters in many kinds of field work across the United States. HVAC service in Houston. Property maintenance in Chicago. Commercial cleaning in Detroit. Fire and safety inspections. Pest control. Solar site checks. Equipment service calls. If the team goes to a site, it needs a standard way to prove the visit happened.
Why are paper job cards and text messages not enough?
Paper and text messages fail because they are incomplete, hard to search, and easy to lose. Small field teams need one digital record per visit with required proof fields, not fragments spread across notebooks, phones, and inboxes.
Paper feels familiar, but it breaks down fast. Handwriting is unclear. Pages go missing. Photos never make it onto the form. A client signature may be collected, but nobody can match it to the exact arrival time or photos from that visit.
Text messages are not much better. They are fast, but they do not create a clean process. One technician may send three photos. Another sends none. One includes the address. Another just writes, “Done.” Important proof ends up on personal devices and gets buried under other conversations.
This becomes more painful as the team grows from five people to fifteen or twenty. The owner cannot personally check every job. The office needs records that are consistent, not dependent on who happened to remember what that day.
A digital workflow solves that by turning “proof” into required steps. The team cannot complete a job until the needed evidence is there. That is a huge improvement over hoping people remember to send updates after the fact.
What proof should every site visit record include?
Every site visit record should include job details, arrival and completion times, photos, location evidence, work notes, and client sign-off when needed. Those six items cover most disputes and help the office approve work quickly.
Here is a practical checklist for small field teams in the United States.
1. Basic job information
Start with the client name, site address, assigned worker, service type, and scheduled date. This sounds obvious, but many proof problems start when the photo and the job are not clearly linked.
Make the work order visible to the field worker on a phone. That reduces errors from handwritten addresses or old printed job cards. If you handle recurring or repeat work, include the exact task scope for that visit.
2. Time proof
Capture when the worker started travel if needed, when they arrived on site, when work began, and when the visit ended. For many teams, arrival and completion times are the most important.
This helps in several ways. It supports payroll review. It helps answer client questions. It creates a record if the customer later claims the worker was late or never came. For teams that bill by labor time, it also supports invoicing and job costing.
If your team needs this, use a consistent method such as in-app time tracking instead of handwritten times added later from memory.
3. Location proof
Location proof should confirm that the worker was at the expected site. In practice, this often means capturing the visit from the assigned job on a phone and storing the visit details with the site record.
Location proof does not need to be complicated. The goal is practical confidence, not surveillance theater. Managers need enough evidence to trust that the visit happened where it should have happened.
For teams doing route-based or on-site service work, this is often strongest when location is tied directly to the visit workflow in a mobile app, rather than a separate check-in process.
4. Photo proof
Photos are often the most useful proof for field jobs. They show condition, completion, safety issues, damage, inventory, or access problems. They also reduce back-and-forth with clients and the office.
Set simple photo rules. Require at least one arrival photo, one work-in-progress photo if relevant, and one completion photo. For some jobs, add a close-up and a wide shot. For exterior work, require a picture that shows the building or unit identifier.
Good rules matter more than high image quality. A clear phone photo taken at the right moment is more useful than ten random photos with no context.
5. Work notes
A short, structured note helps explain what happened. That might include what was serviced, what was found, what parts were used, what could not be completed, and what follow-up is needed.
Avoid long free-form essays. Small field teams do better with short prompts. For example: “Work completed,” “Issue found,” “Customer contact on site,” and “Next step needed.” This makes reporting cleaner later.
6. Client sign-off
Not every visit needs a signature, but many do. A sign-off can confirm that work was completed, access was provided, or the customer reviewed the outcome. It can also reduce billing disputes.
For residential, commercial, or facility work, decide which job types require sign-off and which do not. For example, emergency call-outs may need one. Exterior checks at locked sites may not. The key is consistency.
How do you build a paperless workflow your team will actually use?
Keep the workflow short, mobile, and mandatory at the job level. If a tech can finish it in under two minutes after the work is done, adoption is much higher.
A practical workflow for small field teams should look like this:
Step 1: Create the job before the visit
The office or dispatcher should create a job with the client, address, scope, due date, and assigned worker. Keep this record simple. Too many fields slow everyone down.
Use a shared system with clear status stages. Many teams start with “Scheduled,” “On site,” “Work done,” “Waiting review,” and “Completed.” A board-based setup can make this easy to see across all open jobs using boards and views.
Step 2: Define required proof by job type
Not every visit needs the same proof. A maintenance inspection may need five photos and a signature. A simple delivery confirmation may need one photo and a timestamp.
Create templates by work type. That way the technician is not guessing in the field. The job itself tells them what to capture.
Step 3: Capture proof on the phone during the visit
The field worker should open the assigned job on their phone and complete the required proof steps in sequence. This is where paperless workflows win. The evidence is attached to the job as it happens.
For example, a property maintenance tech in Chicago might:
- Mark arrival.
- Take an exterior site photo.
- Add two issue photos.
- Write a short work note.
- Capture client sign-off.
- Mark the job complete.
This is also where an ai site visit process can help managers review records faster later, because the proof is already structured and tied to the job.
Step 4: Review exceptions in the office
Do not make office staff inspect every normal visit in detail. Instead, review exceptions. Missing sign-off. Too few photos. Very short visit time. Repeat issue at the same site. Follow-up needed.
This keeps admin workload under control while still improving proof quality.
Step 5: Use proof for billing, reporting, and follow-up
A proof workflow should not end at completion. The record should help the next business step happen faster. That may be invoice preparation, customer communication, warranty follow-up, or internal performance review.
If managers want trends, they should be able to see them in reporting without exporting notes from paper forms.
What does a strong photo and sign-off standard look like?
A strong standard is simple, specific, and repeatable. It tells the tech exactly how many photos to take, what each photo should show, and when a signature is required.
Here is a practical standard for small field teams:
Photo standard
- One arrival photo that shows the site or unit identifier
- One issue or problem photo before work begins
- One completion photo after the work is done
- One extra close-up photo for repairs, damage, or replaced parts if relevant
Train the team to avoid blurry photos, dark photos, and random close-ups with no context. If the work happened inside a large property, include a room marker, suite number, or equipment label when possible.
Sign-off standard
Require sign-off when:
- The customer or site contact is present
- The work is billable and needs approval
- The job scope changed on site
- The client contract expects completion confirmation
Do not let signatures become a bottleneck. If no contact is present, have a fallback rule. That might be “photo proof plus note” for specific job types. The point is not to force a signature on every job. The point is to make the proof standard clear.
Note standard
Good notes should answer three questions:
- What was done?
- What was found?
- What happens next?
A short note like this is enough: “Replaced damaged switch. Tested unit. System running. Recommend follow-up on worn wiring next visit.”
How can small teams keep proof records clean and usable?
Small teams keep proof records clean by using required fields, simple templates, and a short review process. The system should prevent missing basics instead of asking managers to chase them later.
The easiest way to lose a paperless system is to make it too flexible. If every technician records proof in a different way, the office ends up with digital chaos instead of paper chaos.
Set rules that keep records useful:
Use mandatory proof fields
If a job type requires three photos and a sign-off, do not leave that optional. Optional proof often becomes missing proof.
Standardize job stages
Use the same status flow across the team. This makes it easy to see where jobs are stuck. It also helps managers know whether “done” means truly complete or just “the tech left.”
Separate normal work from exceptions
Managers should not have to inspect every routine visit. Instead, flag unusual jobs for review. This could include missing proof, customer issues, repeat visits, or jobs that exceeded expected time.
Store proof with the job, not in chat
Proof should live with the work record. That way, anyone in the office can find it later without searching phones, text threads, or email chains.
For teams doing repeat on-site work, this matters a lot. A manager can compare previous records, see trends, and spot recurring issues across field visits.
Where does AI help in a site visit proof workflow?
AI helps after capture, not instead of capture. It can summarize notes, flag missing proof, and highlight exceptions, but your team still needs clear photos, time records, and sign-off from the field.
That is the right way to think about it. AI is not a replacement for field discipline. It is a layer that helps managers review and use proof faster.
For example, an ai site visit review process may help you:
- Spot jobs with no completion photo
- Identify repeat issues at the same site
- Summarize long notes for quick office review
- Flag visits with unusually short or long durations
- Group jobs needing client follow-up
But AI only works well when the raw record is structured. If the technician sends scattered texts, unlabeled photos, and vague notes, there is not much to analyze.
For a small team, the first win is not advanced AI. The first win is getting every tech to follow the same mobile workflow every time. Once that is in place, automation and review become much more useful. If your team wants less manual chasing, workflow automation can help move jobs, notify staff, or surface exceptions.
How should you roll this out with a team of 5 to 30 people?
Roll it out in one service line first, with one simple proof standard. Train the team in the field, test for a week, then tighten the rules based on what people actually miss.
A phased rollout works better than a company-wide change overnight.
Start with one use case
Pick one common, repeatable type of work. For example:
- Preventive maintenance visits
- Service call completions
- Property inspection visits
Do not begin with your most complex job type. Start where you can create a simple standard and get quick adoption.
Train with real examples
Show good and bad examples of proof records. Demonstrate what a usable completion photo looks like. Show what a helpful note looks like. Explain when sign-off is required.